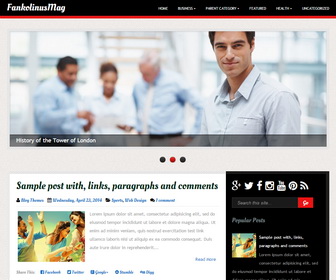
FankolinusMag is an Elegant Looking, 2 Columns Blogger Template. FankolinusMag Blogger Template has a Right Sidebar, Slider, 4 Columns Footer, Dropdown Menu, Related Posts, Social and Share Buttons, Google Fonts, Auto Post Summaries and More Features.
|
Template name : FankolinusMag
Template type : 1 Sidebar, 2 Column, 4 Column footer, Adapted from WordPress, Black, Blue, Business, Elegant, Featured Section, Fixed width, Fresh, Magazine, Red, Related Posts, Right Sidebar, Slider, Top Navigation Bar, Web 2.0, White Release date : July 1, 2015 Author Name and URL : Lasantha Bandara / http://www.premiumbloggertemplates.com/ Original Designer URL : http://simplewpthemes.com/ Basic Instructions : How to install a Blogger template Advanced Details : http://www.premiumbloggertemplates.com/fankolinusmag-blogger-template/ |
How to Configure FankolinusMag Blogger Template
Read instructions given below to configure FankolinusMag Blogger Template.
How To Add Links to Top Navigation Menu

Find this in "Edit HTML":
<ul id='menu-primary-items'>

<li><a expr:href='data:blog.homepageUrl'>Home</a></li>

<li><a href='#'>Business</a>
<ul class='sub-menu'>
<li><a href='#'>Internet</a></li>
<li><a href='#'>Market</a></li>
<li><a href='#'>Stock</a></li>
</ul>
</li>

...

<li><a href='#'>Uncategorized</a></li>

</ul>
Replace "#" marks with real URLs and change anchor texts as you like.
How To Configure Slider
Find this:
<div class='slides-containerpbt'>

<!-- slide 1 code start -->
<div class='slidepbt'>
	<a href='#'><img height='344' src='https://3.bp.blogspot.com/-ZT6jD1oM0A8/VZEkJK4osxI/AAAAAAAANuc/SwUPDhGsupU/s1600/slide-image-1.jpg' width='944'/></a>

	<div class='caption' style='bottom:0'>
		<p>Introducing San Francisco</p>
	</div>
</div>
<!-- slide 1 code end -->

<!-- slide 2 code start -->
...
<!-- slide 2 code end -->

<!-- slide 3 code start -->
...
<!-- slide 3 code end -->

</div>
There are 3 slides in the slider. You can add or remove more slides if you want.
Editing First slide: Replace,
"#" mark with the URL need to go when someone click on slide image,
"Introducing San Francisco" with your real slide title,
"http://3.bp.blogspot.com/-ZT6jD1oM0A8/VZEkJK4osxI/AAAAAAAANuc/SwUPDhGsupU/s1600/slide-image-1.jpg" with your slide image URL.
Follow same procedure for other 2 slides.
How To Configure Social Buttons

Find this in "Edit HTML":
<div class='social-buttonspbt widget'> <a href='https://plus.google.com/' rel='nofollow' target='_blank' title='Google Plus'><i class='fa fa-google-plus'/></a> <a href='https://twitter.com/' rel='nofollow' target='_blank' title='Twitter'><i class='fa fa-twitter'/></a> <a href='https://www.facebook.com/' rel='nofollow' target='_blank' title='Facebook'><i class='fa fa-facebook'/></a> <a href='http://instagram.com/' rel='nofollow' target='_blank' title='Instagram'><i class='fa fa-instagram'/></a> <a href='https://www.youtube.com/' rel='nofollow' target='_blank' title='Youtube'><i class='fa fa-youtube'/></a> <a href='http://www.pinterest.com/' rel='nofollow' target='_blank' title='Pinterest'><i class='fa fa-pinterest'/></a> <a expr:href='data:blog.homepageUrl + "feeds/posts/default"' rel='nofollow' target='_blank' title='RSS'><i class='fa fa-rss'/></a> </div>
Add your own social links replacing default social profile URLs.
