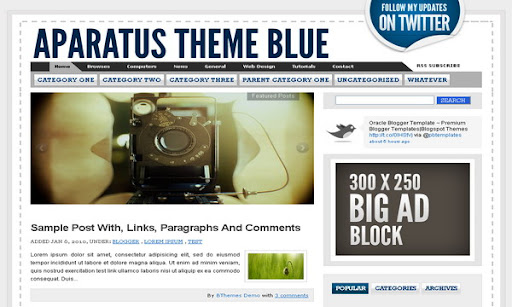
|
Template name : Aparatus Blue
Template type : 1 Sidebar, 2 Column, Adapted from WordPress, Blue, Elegant, Featured Section, Fixed width, Magazine, Premium, Right Sidebar, Slider, Tabbed widget, Top Navigation Bar, Web 2.0, White Release date : November 23, 2010 Coder/Designer Name(s) : Lasantha Bandara / Fearless Flyer Coder/Designer URL(s) : http://www.premiumbloggertemplates.com/ Basic Instructions : How to install a Blogger template Advanced Details : http://www.premiumbloggertemplates.com/2010/11/aparatus-blue-premium-blogger-template.html |
Configure Meta tags
Login to your blogger dashboard--> layout- -> Edit HTML.Now Scroll down to where you see below codes :
<meta content='DESCRIPTION HERE' name='description'/>
<meta content='KEYWORDS HERE' name='keywords'/>
Replace DESCRIPTION HERE,KEYWORDS HERE as below.
DESCRIPTION HERE:Write your blog description
KEYWORDS HERE:Write the keywords of your blog separated by comma.
How To Configure Favicon:
Login to your blogger dashboard--> layout- -> Edit HTML.Now Scroll down to where you see below code :
<link href='YOUR-FAVICON-URL' rel='shortcut icon' type='image/vnd.microsoft.icon'/>
Now replace "YOUR-FAVICON-URL" with your Favicon address/url.
Configure Featured Content Slider:
Login to your blogger dashboard--> layout- -> Edit HTML.Find <!-- Featured Content Slider Started -->.Now I have shown below how to configure first slide of the slider.
This is the code for the first slide :
<!-- Slide 1 Code Start -->
<div class='imageElement'>
<h3>SLIDE-1-TITLE-HERE</h3>
<p>Replace these every slider sentences with your featured post descriptions.Go to Blogger edit html and find these sentences.Now replace these with your own descriptions.This theme is Bloggerized by Lasantha - Premiumbloggertemplates.com[...]</p>
<a class='open' href='SLIDE-1-LINK-HERE' title='Go to Article'/>
<img class='full' src='http://1.bp.blogspot.com/_4HKUHirY_2U/TOkSW1jyMII/AAAAAAAAIGA/N5mqUyfW55Y/s1600/1-large_image.jpg' style='width:590px;height:278px;border:none;'/>
<img class='thumbnail' src='http://4.bp.blogspot.com/_4HKUHirY_2U/TOkSXVrbe3I/AAAAAAAAIGI/WQ3EpOq3qpc/s1600/1-small_image.jpg' style='width:100px;height:75px;border:none;'/>
</div>
<!-- Slide 1 Code End -->
Now replace,
"SLIDE-1-TITLE-HERE" with your first featured post .
"SLIDE-1-LINK-HERE" with your first featured post .
"Replace these every slider sentences with your featured post descriptions.Go to Blogger edit html and find these sentences.Now replace these with your own descriptions.This theme is Bloggerized by Lasantha - Premiumbloggertemplates.com[...]" with your first featured post slider .
"http://1.bp.blogspot.com/_4HKUHirY_2U/TOkSW1jyMII/AAAAAAAAIGA/N5mqUyfW55Y/s1600/1-large_image.jpg" with of the slide.(size should be width:590px and height:278px)
"http://4.bp.blogspot.com/_4HKUHirY_2U/TOkSXVrbe3I/AAAAAAAAIGI/WQ3EpOq3qpc/s1600/1-small_image.jpg" with of the slide.(size should be width:100px and height:75px)
Now you have configured first slide of the slider.Also now you can configure other 4 slides of this slider like this.
About Multi Tab View Widget
You don't want to change anything of the multi tab view widget.It is included built-in Most Popular post , Categories and Blog Archive Widgets.
How To Configure First Navigation Menu
Find <!-- First Navigation Menu Start --> inside your template.(using CTRL+F).This is the beginning of the first navigation menu.Now follow the steps given here:
How To Configure a Navigation Menu
How To Configure Second Navigation Menu
Find <!-- Second Navigation Menu Start --> inside your template.(using CTRL+F).This is the beginning of the first navigation menu.Now follow the steps given here:
How To Configure a Navigation Menu
How To Configure Sidebar Twitter Section
Find This:
<script src='http://twitter.com/statuses/user_timeline/btipandtrick.json?callback=twitterCallback2&count=1' type='text/javascript'/>
Now replace "btipandtrick" with your Twitter username.
How To Configure Twitter Header Logo
Find This:
<div id='twitter-badge'><a href='http://twitter.com/USERNAME'>follow</a></div>
Replace "USERNAME" with your Twitter username.
If you have any problem regrading this template,leave a comment below.
Important !!!:
Please do not remove the footer credit. I spend several hours to create this blogger template. So that you can use it for your blog. All I ask is, stay the credit intact.
License:
This free Blogger template is licensed under the Creative Commons Attribution 3.0 License,which permits both personal and commercial use.
However, to satisfy the 'attribution' clause of the license, you are required to keep the footer links intact which provides due credit to its authors. For more specific details about the license, you may visit the URL below:
http://creativecommons.org/licenses/by/3.0/

Excuse me, I configured almost everything to my needs, but only later I realised there is error with the posting date: All show Jan 6, 2010.
Can you please hlpe me?
Dear Lasantha,
For the previous comment that I requested help about the timestamp problem showing Jan 6 in all of my posts, I found a solution by myself.
I copy paste experimentally from other templates and worked out the solution finally, a simple one.
**
1) Log into your Blogger >> Design >> Edit HTML >> Edit Template >> TICK Expand Widget Template.
2) Put your cursor into inside the template content >> CTRL + F >> Search for 'Jan 6'.
3) Replace 'Jan 6' with
4) Save template >> Refresh your Blog >> Done!
**
Lasantha, thanks for your effort in Bloggerised the template. Too nice for me to change template, so I cracked my head. You may want to add the above steps inside the setup guide. Thanks again!
Enjoy using your creation mate...!
however, i dont really like the 'Blog Posts'
find it too small
how i can change it?
I really liked this template, but how do I create a two-column header? and how to make 3 new columns in the footer?
I like this template, but how to make the header make two columns? and how to make 3 new columns in the footer?
The theme is really very clean and impressive but i small thing, It should have to be centered align and not right.
Right now it floats on right side which doesn't looks good in large resolution monitors. Can you please make it centered align.
Thanks