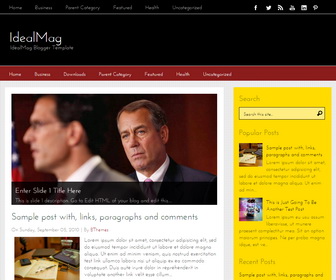
IdealMag is a Simple and Beautiful, 2 Columns Blogger Template for your Blog. IdealMag Blogger Template has a jQuery Slider, 2 Dropdown Menus, Related Posts, Breadcrumb, 4 Columns Footer, and More Features.
|
Template name : IdealMag
Template type : 1 Sidebar, 2 Column, Adapted from WordPress, Black, Breadcrumb, Elegant, Featured Section, Fixed width, Fresh, Magazine, Minimalist, Premium, Red, Related Posts, Right Sidebar, Slider, Top Navigation Bar, Web 2.0, White, Yellow Release date : April 3, 2014 Author Name and URL : Lasantha Bandara / http://www.premiumbloggertemplates.com/ Original Designer URL : http://www.simplewpthemes.com/ Basic Instructions : How to install a Blogger template Advanced Details : http://www.premiumbloggertemplates.com/idealmag-blogger-template/ |
How to Configure IdealMag Blogger Template
Read instructions given below to configure IdealMag Blogger Template.
How To Configure Meta tags:
Go to "Template" --> "Edit HTML" of your blog. Now Scroll down to where you see below codes :
<meta content='DESCRIPTION HERE' name='description'/>
<meta content='KEYWORDS HERE' name='keywords'/>
Replace DESCRIPTION HERE,KEYWORDS HERE as below.
DESCRIPTION HERE:Write your blog description
KEYWORDS HERE:Write the keywords of your blog separated by comma.
How To Add Links to First Top Navigation Menu
Find this in "Edit HTML":
<ul id='menu-primary-items'>

<li><a expr:href='data:blog.homepageUrl'>Home</a></li>

<li><a href='#'>Business</a>
<ul class='sub-menu'>
<li><a href='#'>Internet</a></li>
<li><a href='#'>Market</a></li>
<li><a href='#'>Stock</a></li>
</ul>
</li>

<li><a href='#'>Parent Category</a>
<ul class='sub-menu'>
<li><a href='#'>Child Category 1</a></li>
<li><a href='#'>Child Category 2</a></li>
<li><a href='#'>Child Category 3</a></li>
<li><a href='#'>Child Category 4</a></li>
</ul>
</li>

<li><a href='#'>Featured</a></li>

<li><a href='#'>Health</a>
<ul class='sub-menu'>
<li><a href='#'>Childcare</a></li>
<li><a href='#'>Doctors</a></li>
</ul>
</li>

<li><a href='#'>Uncategorized</a></li>

</ul>
Replace "#" marks with real URLs and change anchor texts as you like.
How To Configure Social Buttons
Find this in "Edit HTML":
<div id='social-wrap'>
<ul id='socialbwrap'>
   <li><a href='#' id='facebook' title='Facebook'/></li>
   <li><a href='#' id='twitter' title='Twitter'/></li>
   <li><a href='#' id='rss' title='RSS'/></li>
   <li><a href='#' id='youtube' title='Youtube Channel'/></li>
   <li><a href='#' id='linkedin' title='Linkedin'/></li>
   <li><a href='#' id='pinterest' title='Pinterest'/></li>
</ul>
</div>
Add your own social links replacing "#" marks.
How To Add Links to Second Top Navigation Menu
Find this in "Edit HTML":
<ul id='menu-secondary-items'>

<li><a expr:href='data:blog.homepageUrl'>Home</a></li>

<li><a href='#'>Business</a>
<ul class='sub-menu'>
<li><a href='#'>Internet</a></li>
<li><a href='#'>Market</a></li>
<li><a href='#'>Stock</a></li>
</ul>
</li>

<li><a href='#'>Downloads</a>
<ul class='sub-menu'>
<li><a href='#'>Dvd</a></li>
<li><a href='#'>Games</a></li>
<li><a href='#'>Software</a></li>
</ul>
</li>

<li><a href='#'>Parent Category</a>
<ul class='sub-menu'>
<li><a href='#'>Child Category 1</a></li>
<li><a href='#'>Child Category 2</a></li>
<li><a href='#'>Child Category 3</a></li>
<li><a href='#'>Child Category 4</a></li>
</ul>
</li>

<li><a href='#'>Featured</a></li>

<li><a href='#'>Health</a>
<ul class='sub-menu'>
<li><a href='#'>Childcare</a></li>
<li><a href='#'>Doctors</a></li>
</ul>
</li>

<li><a href='#'>Uncategorized</a></li>

</ul>
Replace "#" marks with real URLs and change anchor texts as you like.
How To Configure Featured Content Slider:
Find this in "Edit HTML":
<div id='sliderbwrap'>
   <ul class='bjqs'>

      <!-- slide 1 code start -->
      <li>
         <a href='ENTER-SLIDE-1-LINK-HERE'><img height='340' src='https://3.bp.blogspot.com/-ZZpoSt3MJVo/Uz0GcrqYLkI/AAAAAAAAH80/Xna4tAokfqY/s1600/slide-image-1.jpg' width='630'/></a>
         <div class='slider-summary'>
            <h2 class='post-title entry-title'><a href='ENTER-SLIDE-1-LINK-HERE'>Enter Slide 1 Title Here</a></h2>
            <p>This is slide 1 description. Go to Edit HTML of your blog and edit this....</p>
         </div>
      </li>
	  <!-- slide 1 code end -->

	  <!-- slide 2 code start -->
      <li>
         <a href='ENTER-SLIDE-2-LINK-HERE'><img height='340' src='https://3.bp.blogspot.com/-Z091FvWAzVo/Uz0GdGek4JI/AAAAAAAAH88/fFEl8EL0Obk/s1600/slide-image-2.jpg' width='630'/></a>
         <div class='slider-summary'>
            <h2 class='post-title entry-title'><a href='ENTER-SLIDE-2-LINK-HERE'>Enter Slide 2 Title Here</a></h2>
            <p>This is slide 2 description. Go to Edit HTML of your blog and edit this....</p>
         </div>
      </li>
	  <!-- slide 2 code end -->

	  <!-- slide 3 code start -->
      <li>
         <a href='ENTER-SLIDE-3-LINK-HERE'><img height='340' src='https://4.bp.blogspot.com/-LkZPHHj56MA/Uz0GdxGc3wI/AAAAAAAAH9E/thKYTgNhP9M/s1600/slide-image-3.jpg' width='630'/></a>
         <div class='slider-summary'>
            <h2 class='post-title entry-title'><a href='ENTER-SLIDE-3-LINK-HERE'>Enter Slide 3 Title Here</a></h2>
            <p>This is slide 3 description. Go to Edit HTML of your blog and edit this....</p>
         </div>
      </li>
	  <!-- slide 3 code end -->

   </ul>
   <!-- .bjgs -->
</div>
<!-- #slider -->
There are 3 slides in the slider. You can add or remove more slides if you want.
Now replace,
"ENTER-SLIDE-X-LINK-HERE"s with your real slide link,
"Enter Slide X Title Here" with your real slide title,
"This is slide X description. Go to Edit HTML of your blog and edit this.... with your real slide description,
Slide image URL,
for each slide. (X = 1 or X = 2 or X = 3)
Important !!!:
Do not remove the footer credits. This IdealMag Blogger template is free for both personal and commercial use. However, you are required to keep the footer links intact which provides due credit to its designers and authors.
